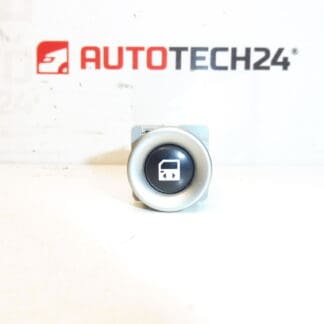
Descrizione
Lane keeping assist control for CITROEN, PEUGEOT and other Stellantis models
Part description
The used lane keeping assist control, bearing the numbers 9817735877 and 98177358ZD, is designed to operate the vehicle’s corresponding driver-assistance function. It is a control element, not the system’s sensor or camera itself. Replacing a faulty or mechanically damaged control with a used part is a cost-effective alternative to buying a new one.
When selecting a part, compare the product numbers, control design, connector and mounting with the existing part. Matching the model name alone is not sufficient, as the design may depend on the vehicle’s equipment.
Technical information
- Manufacturer: not specified; the supplied information lists the designation Stellantis CITROEN PEUGEOT.
- Model: Citroën Berlingo K9, FIAT DOBLO III, OPEL COMBO E K9, PEUGEOT RIFTER, Toyota ProAce City.
- Other numbers: not specified.
- Part type: lane keeping assist control.
- Category: electrical components – other controls and switches.
- Condition: used part.
The models are taken from the supplied labels. Model years, engine types and exact equipment variants are not specified in the supplied information.
Product codes
- Product codes: 9817735877, 98177358ZD.
Use both designations when searching for a replacement control and comparing it with the numbers on the original part.
Installation recommendations
The following general procedure applies to this type of electrical control. The exact method of access, removal and function testing depends on the specific vehicle model and version. The supplied information does not include model-specific installation instructions.
1) Before installation
- Compare the markings on the old and replacement parts, the shape of the front section, symbols, connector, contacts and fasteners.
- Inspect the used control: check for cracks, damaged clips, bent contacts, corrosion and signs of liquid ingress.
- Check that the control moves without sticking. Smooth mechanical operation alone does not confirm electrical functionality.
- Before replacing the part, rule out obvious damage to the connector or wiring. The control itself may not be the cause of an inoperative assist system.
2) Tools and materials required
- Plastic trim removal tools for gently releasing the trim.
- Standard hand tools suitable for the fasteners used.
- A flashlight, a soft surface and a clean cloth.
- If needed, a product suitable for cleaning electrical contacts; use it according to the manufacturer’s instructions and do not spray it inside the control without due consideration.
3) Step-by-step installation procedure
- Park the vehicle safely, secure it against movement and switch off the ignition.
- Following the vehicle’s service procedure, allow the electrical systems to enter their idle state and disconnect the power supply as prescribed.
- Determine how the control is mounted and how to access it. Do not force covers loose without first checking the position of the clips or screws.
- If access requires trim removal, carefully release it using a suitable tool and protect visible surfaces from scratches.
- Release the original control’s fasteners and pull it out only far enough to access the connector. Do not pull or strain the wiring.
- Release the connector lock and disconnect it by pulling on the connector housing, not the wires.
- Inspect the connector and accessible wiring. If you find corrosion, overheating or damage, address the cause of the fault first.
- Compare the two controls again. If the connector, its keying or the mounting does not match, do not proceed by forcing or modifying the parts.
- Connect the replacement control and check that the connector is properly locked. Route the wiring so that it is neither pinched nor under tension.
- Seat the control, secure it using the original method and reinstall any covers that were removed. Restore the power supply according to the vehicle manufacturer’s procedure.
4) Checks after installation and function testing
- Check that the control is firmly seated, the trim fits correctly and the control moves freely.
- After switching on the ignition, check that the control responds as described in the vehicle manual and that any corresponding indicator appears.
- If a test drive is required to check the system, carry it out in safe conditions in accordance with the manufacturer’s instructions. Do not deliberately cause the vehicle to leave its lane in an unsafe manner.
- If the fault persists, continue by diagnosing the power supply, wiring and associated system; do not automatically assume that the control is faulty.
5) Common installation mistakes and how to avoid them
- Selecting by appearance alone: always compare the part markings, connector and mounting as well.
- Breaking the clips: first determine how they are released and use appropriate force.
- Pulling on the wires: disconnect the connector only after releasing its lock, and hold it by the housing.
- Connector not fully engaged or wiring harness pinched: check the connector is locked and the wiring is routed correctly before closing the trim.
- Working on a live circuit: follow the manufacturer’s procedure for safely disconnecting and reconnecting the power supply.
Reasons why the part may be damaged
The following causes of damage may generally occur with this type of control; they do not describe faults in the item offered:
- Mechanical wear of the control mechanism over prolonged use.
- Excessive force or impact, which may damage the button, control housing or mounting.
- Ingress of liquids and dirt, leading to sticking or damage to the electrical contacts.
- Moisture and connector corrosion, which may cause an unreliable electrical connection.
- Careless removal, particularly prying with an unsuitable tool, breaking clips and pulling on the wiring.